This memo includes a description of the technical facilities we have built so far, as well
as the conventions for collaborative code development. Corresponding code is under the InfoBus dldev source tree,
as is this README (dldev/src/PilotsDL)
Table of Contents:
1. Error and Event Logging Infrastructure
   1.1 Overview
   1.2 Usage Details for Error Handling
   1.2.1 Throwing Exceptions
   1.2.2 Catching Exceptions
   1.2.3 Subclassing (for a more specific type of exception)
2. Memory Management Infrastructure
   2.1 Overview
   2.2 Selected Methods of the Buffer Class
   2.3 Selected Methods of the LockableBuffer Class
   2.4 Selected Methods of the StringBuffer Class
   2.5 Selected Methods of the XMLStringBuffer Class
   2.6 Selected Methods of the Packet Class
   2.7 Help In Dealing With Handles
3. Communication Infrastructure
   3.1 Selected Methods for Connections
   3.2 The InfoBus Name Resolution Facility
   3.2.1 Selected Methods of the Name Resolution Facility
4. Project Software Management
   4.1 CVS Installation and Operation
   4.2 Current CVS Problems and Work-Arounds
   4.2.1 New Directories Not Coming in During 'Update' Operation
   4.2.2 Permissions Screwed Up in Repository
5. PalmPilot and Telecommunication
6. CodeWarrior Windows SDK Support and Pilot Emulator Installation
7. CodeWarrior Tricks and Gotchas
8. Using the DietORB library


1. Error
and Event Logging Infrastructure


1.1 Overview


The Error and Event Logging Infrastructure (EELI) provides a uniform way for our Pilot applications to (i) report
errors or other messages to users on the screen and, (ii) communicate error conditions among caller and callee
within an application. User messages are displayed on automatically generated popup windows with OK buttons. This
message display facility has the following features:
PicManager::Dither: Will convert to black/white (13)
Caller/callee error communication uses the C++ throw/catch mechanism. However, EELI enhances that mechanism by adding the following facilities:
EELI consists of the EventManager and PilotException classes. EventManager is responsible
for the display of messages, and for keeping event histories. EventManager's PilotException subclass is the base
class for all exceptions. Developers may subclass PilotException.
At the heart of the EventManager are its family of static ShowMsg() methods. They take either one or two strings, and optionally one error code. The messages and error number will be reported to the user as shown in the example above. In addition, the errno of the last call to a ShowMsg() method are always stored and is available for recall. When there are two string message parameters, the first is taken to be the location of the error, and the second is taken to be the message. For example:
  EventManager::ShowMsg("PicManager::Dither",
                     "Will convert to black/white",
                     (13));
would display an 'official' PalmPilot error popup with the example above. In addition, the error number would be available via the static EventManager::GetErrno().
Visual error display to the user can be turned on and off by using the static SetVisibleErrorReporting() method
on EventManager.
The AddEventHistory(CharPtr/StrBufPtr) on EventManager instances is used to add messages to the
event history. Note that the event history methods are not static. The DisplayEventHistory() method displays all
of the accumulated messages in an automatically generated popup window, and the MostRecentEvent() message returns
a StringBuffer with the most recent message that was added to the event history. Similarly, GetEventHistory() returns
the whole history in a StringBuffer.
A testing facility for EventLogger is available at dldev/src/pilotsDL/TestProjects.
1.2 Usage Details for Error Handling
The constructor for PilotException takes the same parameters as the ShowMsg() method explained above: a code origin, the message, and an errno. Various constructors allow you to leave out some of these.
   if (<something goes wrong>) {
     // Optionally show a msg. Don't do that if you expect
     // someone up the call stack to catch the exception and
     // put up its own message:
     EventManager::ShowMsg("myFunc", "I couldn't do it.");
     throw PilotException("myFunc",
                          "The dog ate the pointer",
                          ENOLUCK);
   }
1.2.2 Catching Exceptions
Here is how you call something, and catch errors. Note: the compiler/runtime take care of deallocating all exception
objects. Don't try to delete them.
   try {
     <call code that tries to make a socket connection>
   }
   catch (ConnectionException& ce) {
     // Handle all connection-oriented exceptions here.
     // ConnectionException is a subclass of PilotException.
     // ce is deallocated automatically.
   }
   // All non-connection related exceptions are caught here:
   catch (PilotException& pe) {
     // optionally show the exception's event history:
     pe.DisplayEventHistory();
     throw;    // throw same exception
   }
Or, we could add to the event history of the exception like this:
     try {
       ...
       }
     catch (ConnectionException& e) {
     // Compose some nice message to add to the
     // existing event history stack:
     StringBuffer errMsg;
     errMsg.append("Connection to ");
     errMsg.append(ip_address);
     errMsg.append(" failed.");
     e.AddEventHistory(errMsg);
     // re-throw error:
     throw;
     }
Alternatively, if we want to throw another, specialized exception:
   catch (PilotException& pe) {
     // Make a new exception of class BufferException. Make it's event
     // history be the same as what's now in pe. Add a new message to
     // the history, and throw the new exception. All this is done
     // by passing the old exception to BufferException's constructor:
     throw BufferException("Layer below me messed it all up", pe);
   }
Note: you can also leave out the '&', like this:
catch (PilotException pe)
as opposed to:
catch (PilotException& pe)
This works fine, but it takes a bit more storage during the throw process because an extra temporary instance of
PilotException is created.
1.2.3 Subclassing (for a more specific type of exception)
You may want to subclass PilotException to provide a more specific indication of your modules set of exceptions. Here is how you do that:
   class ConnectionException : public PilotException {
   public:
     // Define as many constructors as you need (see
     // PilotException constructors for available choices):
     ConnectionException(CharPtr errloc, CharPtr msg)
       : PilotException(errloc, msg) {};
     ConnectionException(CharPtr errloc,
	   	       CharPtr msg,
		         short errno)
       : PilotException(errloc, msg, errno) {};
     ConnectionException(CharPtr errloc,
		         CharPtr msg,
		         EventManager &excInst)
       : PilotException(errloc, msg, excInst) {};

     ~ConnectionException() {};
   };
For more information, refer to EventManager.h and PilotException.h
2. Memory
Management Infrastructure
2.1 Overview
The MMI provides a base for dealing with the tricky issue of memory usage on the Pilot: On the one hand, it is
advantageous to use the memory Handle facility, rather than heap pointers, because the use of Handles gives the
OS the opportunity to move/consolidate memory. On the other hand, using Handles is tricky, because locking/unlocking/freeing
is critical to avoiding obscure bugs.
The MMI is an extensible facility that uses Handles, but provides a friendlier abstraction. It was created by consolidating
contributions by MICO, and the project members. Here's the current class hierarchy:
                         Buffer
                           |
                           v
             ---------LockableBuffer---------
             |             |                |
             v             v                v
         Packet     StringBuffer  PersistentLockableBuffer
                           |                |
                           ------------------
                                   |
                                   v
                         PersistentStringBuffer
Buffer provides a sequence of bytes with a read and a write pointer. So there can be a writer
putting information into a buffer, with a reader trailing behind to access the info. Read and write pointers can
be moved with seek operations, much like Unix file pointers. 'Put' and 'Get' methods add and read information into
and out of a buffer. All memory management is taken care of. In addition, buffers have the ability to maintain
multi-byte alignment, inserting padding where necessary. This is required to build packets for some low-level internet
protocols. For example, there is a 'Put' method that inserts its paramater into the buffer in such a way that the
following information begins on a 4-byte boundary.
LockableBuffer is derived from Buffer and adds the ability to obtain a pointer into a buffer for reading or writing.
This is not a terribly desirable facility because it can lead to the very memory bounds violations the MMI is trying
to avoid. The facility should be used very sparingly, and primarily by the methods of subclasses. There are two
reasons for including the lock feature: (i) when using low-level functions, such as socket reading function in
the network library, a pointer to memory must be passed as a parameter. The called function then writes directly
to that memory. Without the lock feature, MMI clients would need to have the network utility write to a separate
space, and then copy the information to a buffer using 'Put'. Similarly, (ii), some utilities such as StrStr()
for substring searching expect pointers into memory. So subclasses like StringBuffer need the lock facility.
The Packet class is a convenient way of receiving and preparing packets for network transport. It is mainly there
for backward compatibility with an earlier Packet class.
StringBuffer, finally, allows MMI clients to have a very efficient string management facility, without having to
worry about storage management. String buffers have methods like StrCat, StrCopy, StrCompare, StrNCaselessCompare,
etc.
Two classes PersistentLockableBuffer and PersistentStringBuffer are added which are equivalent to LockableBuffer
and StringBuffer. They use the Database manager for storing the buffer content instead of the memory handle. These
classes are added to make use of relatively unlimited non-volatile memory of the Palm Pilot.
PersistentLockableBuffer implements the functionality of both Buffer and LockableBuffer classes. PersistentStringBuffer
implements the functionality of StringBuffer. They create a database with the name "PilotsDL" if it is
not already existing. Whenever a new Persistent buffer is created, it is created as a new record in the database.
The records are retained across different sessions. To clear the database from the Palm device, one can go to the
applications screen, and delete the database using the menu option.
PersistentDB class is provided to create a database on the Palm given a database name and append flag. When the
append flag is false, the old contents of the database are deleted.
When ByteLockAppend and CharLockAppend are used, the database buffer is expanded by the required number of bytes
and a memory buffer of given size is allocated, locked and the pointer is given to the user. When the buffer is
unlocked, the contents of the memory buffer are transferred to the database buffer and the memory buffer is freed.
AppendItem class is used to maintain the correspondence between memory and database buffers. BufferTests are modified
to test memory or database buffers and the option can be selected at runtime.
The GIOP codec layer can use either memory buffers or database buffers. Currently the codec layer uses persistent
or database buffers. One can use the memory buffers version, by not defining USE_PERSISTENT_BUFFER flag in utils/prefix.h.
When USE_PERSISTENT_BUFFER flag is defined, the ReceivePacket method in Connection class makes use of NetLibDmReceive()
to receive the data into the database buffer directly.
2.2 Selected Methods of the Buffer Class
The Buffer class is not always as comfortable to use as its derived classes. It is expected that most applications
will use the derived classes, though that's not a must. Here are selected methods that are most useful. The authoritative
source is, of course buffer.h and buffer.cc.
All the constructors take an optional EventLogger instance. In addition, they all take three optional arguments
which control memory allocation. These are primarily intended for use by derived classes. Minimum size is used
as the minimum whenever memory is allocated for the buffer. ResizeIncrement is the size we add at least if we have
to enlarge storage space for the buffer. You can check the resize() method to see the details. You shouldn't have
to concern yourself with these, unless you are building a derived class that expects particularly large or small
buffers to be frequent.
Another constructor uses a handle, but should be used with care. Given a handle, that handle will become the storage
for the buffer. I.e. you are putting Buffer functionality around a handle. But note two things: (1) When you destroy
a buffer, the handle is deallocated. And, (2) you don't want somebody else to deallocate the handle. This can happen,
for example, if you use a UI field's handle for making a Buffer. If you ever use FldSetTextHandle() to put a different
handle into that field, the old handle (that is, the handle at the core of your buffer) will be deallocated!!!
The following methods are available for manipulating the buffer contents:
For more information, refer buffer.h
2.3 Selected Methods of the LockableBuffer
Class
Methods CharLockAppend(size) and ByteLockAppend(size) are for appending to LockableBuffers. They return ptrs to
the current end of the buffer (i.e the current write pointer). The buffer will enlarge itself if necessary, and
will advance the write pointer to just beyond the area you are locking before it returns to you.
CharLockOverwrite(size) and ByteLockOverwrite(size) are the same, but you'll be overwriting from the start of the
buffer. The read ptr will be 0. The write pointer will pt to just beyond size.
CharLockRead() and ByteLockRead() instead return ptrs to the current read position. Do not use them for writing.
All these methods require calling Unlock when you are done.
For more information, refer to lockablebuffer.h
2.4 Selected Methods of the StringBuffer
Class
A test suite for StringBuffer is available under dldev/src/PilotsDL/testing/BufferTests. It runs through a sizeable
number of tests on string buffers.
StringBuffer class has constructors for accepting a string, a handle and an optional EventLogger parameter.
The following methods are available for manipulating a StringBuffer contents:
These methods are overloaded to accept a CharPtr, Handle and StringBuffer pointer.
For more information, refer StringBuffer.h
2.5 Selected Methods of the XMLStringBuffer Class
XML string buffers are a subclass of StringBuffer. They allow simple parsing of XML text. You can pull out particular XML elements, you can count how many elements with a particular tag are present, or you can pull out like elements one at a time. The latter acts like a Java enumeration. You get to set the enumeration tag, and then you just call nextElement() over and over.
There are two groups of constructors. One takes a CharPtr, and another takes a StringBuffer as the XML string. Both groups have two variations: the first just makes an XML string buffer with the given string. The second also sets an enumeration tag.
In addition to the methods of StringBuffer, LockableBuffer, and Buffer, the following methods are available for manipulating XMLStringBuffer contents:
For more information, refer to XMLStringBuffer.h
2.6 Selected Methods of the Packet Class
Again, the Packet class is supported for backward compatibility. Most of these methods are simply front-ends to
methods of the superclasses. Remember that through its inheritance, you can use Put, Get, cursor seeking, etc.
Currently Packet class is not used.
The following methods are available for manipulating a Packet contents:
For more information, refer Packet.h
2.7 Help In Dealing With Handles
If you cannot use Buffers because you have to interact with the OS, there is a set of utilities in a module of
the same name. Below are the major methods. These are all static, so you don't ever make an instance of class utility.
You just use the facility with calls like:
utilities::MemHandleCopy(srcHandle, dstHandle);
Users of this module should assign a pt to an EventLogger object to the static variable evLog.
This gives the module an effective way to do error reporting. If you don't, the module will use its own EventLogger
which will properly record all errors in its errno, etc. But there will, of course, be no visual error displays.
In that case, use utitlites::evLog->GetErrno() after calling routines that leave errors codes there. This module
is used a lot by the Buffer class and its derivatives. Chances are that they have made the assignment.
The following methods are available in this module:
For more information, refer to utilities.h
3. Communication
Infrastructure
Basic communications are covered by the Connection class which lets you open and close socket connections. Above
this layer is the CODEC facility, which lets you build packets easily: It understands how to marshall and unmarshall
basic types, like integers, floats, etc. If you build packets with the CODEC facility and send them to IIOP-compliant
CORBA servers, they'll think they have a full-fledged CORBA client to deal with.
Also above the Connection facility is a CORBA name resolution facility that takes the name of an InfoBus service
and finds its IOR (a.k.a object identifier) by connecting to the InfoBus naming service.
This section only describes the Connection class and the naming service, not the CODEC.
Internet access from the Pilot is built up and broken down in two phases: During phase 1 a PPP connection or equivalent
is built up. In phase 2, a socket is connected. You can close sockets, but keep the PPP connection open. This is
very useful if your application is planning to open a new socket connection soon, because building up PPP connections,
for instance through the wireless modem, is slow.
Upon the first connection opening command, Connection instances load a dynamic system library that handles network
access. When you destroy the last Connection instance, that library is unloaded, freeing significant memory. Note
again, though, that if you are going to do multiple interactions across the wire, you just want to open and close
sockets, not shut connections down explicitly, or implicitly by deleting them.
In testing connections, the PortListener facility is very handy. It listens on a port and either just shows on
the screen what it sees, or in addition echoes received information back to the sender. This facility is under
the dldev/src/PilotsDL/testing directory. A Pilot-side connection testing project is there as well. It lets you
open/close connections with the PortListener or any other socket-aware application. It can also send out and receive
packets.
3.1 Selected Methods for Connections
Most of the methods on the Connection class return an error code. Often, evLog->GetErrno() will give more detail.
In all cases, the methods will call evLog->HandleError() if anything goes wrong.
There is a global timeout default for network operations. Sending and receiving use that default timeout.
One of the two methods for opening a connection lets you provide a timeout just for opening the socket. After that,
the timeout reverts to the default. Note that OpenConnection() accomplishes both phases of gaining Internet access:
It cause the Pilot to build up a connection, via PPP, for example, and it opens a socket. Which method is used
for phase one depends on how you set the Network settings in the Prefs application before you started your application.
In any case, you'll most likely see some Pilot UI activity during phase 1 which tells you what's happening (dialing,
running a login script, etc.).
The following methods are available for manipulating a Connection:
Note that, sometimes ReceivePacket receives partial receive buffer when the network
connection is slow and also when the buffer to be received is too large. Make sure to call it repeatedly if necessary.
ReceivePacket appends to the existing packet so one can call it repeatedly to receive a big packet.
Earlier Connection class used Packet instance, now it uses LockableBuffer. This change is made to make it
work with Persistent buffers also.
There are three ways of closing a connection: the following two methods, and deleting a Connection instance.
CloseConnection() will only close a socket; it will not break down the Internet connection. So, once you've done
an initial OpenConnection(), subsequent CloseConnection()/OpenConnection() cycles are fast. The ShutDown() method
closes both the socket, and the Internet connection, unless you explicitly pass in C_DELAYED_SHUTDOWN. The default
for this method is C_IMMEDIATE_SHUTDOWN. So, if you call ShutDown() with no parameter, the socket and the Internet
connection are taken down. A subsequent OpenConnection() will go through both build-up phases.
The destructor will invoke ShutDown() with a settable default close mode. By default, this is C_IMMEDIATE_SHUTDOWN.
But a call to SetCloseMode() prior to destruction lets you destroy a Connection instance without breaking down
the Internet connection. Usually, you'll not mess with that, because you want a way to shut the Internet connection
down.
For more information, refer connection.h
3.2 The InfoBus Name Resolution
Facility
The naming resolution is simple: you make yourself a Naming instance, and call a single method on it. You pass
in the 'naming context' and the name of the service, and you get back an IOR, which is IIOP's name for an OID.
CORBA names are really name spaces, so that you can have the same service name for multiple objects, as long as
these names are in different name spaces. Think of it as a Unix directory kind of hierarchy. We currently have
two main name spaces in use for the InfoBus: dl/Services/Search, and dl/Services/Processing. Within the search
service context we have Infoseek, Dialog, etc. In the processing name space, we have services like InterBib and
the document summarizer.
3.2.1 Selected Methods of the Name Resolution
Facility
The two constructors differ in which Connection object is used to contact the name server. The first constructor
will cause the Naming instance to create a Connection object, use it, and delete it again. The second constructor
lets you pass in a Connection object which should not have an open connection. This object is used, but not destroyed.
Most of the time you'll want to use that second constructor. It ensures that you don't go through building up an
Internet connection (phase 2 above) more than once in the typical sequence of getting an IOR, connecting to the
service, and communicating with it. The GetObject() method resolves a naming context. It is overloaded to accept
either CharPtr or Handle.
Publishing and withdrawing is for services that are running on the Pilot, i.e. for the case where the Pilot
is a server, and others connect to it. This is not yet implemented.
For more information, refer to naming.h
4. Project
Software Management
All the official software is under CVS source code control with the other InfoBus software. The directory structure
at the time of this writing is like this:
dli2/src/pilotsDL/
             common/incs  ;; include files for the major facilities
             common/src   ;; source files for the major facilities
             common/lib   ;; various libraries
             TestProjects ;; CodeWarrior projects for testing modules facilities
             <Project1>   ;; Fun DL-related project
             <Project2>   ;; Another exciting DL-related project
                ...
Note that not all the files and directories created when you make a CodeWarrior project should go into the repository.
We only check in the minimal amount that lets others re-create the project. The necessary files are:
ProjDir/foo.mcp        ;; cvs add -kb foo.mcp  (the Project file)
ProjDir/foo.prc        ;; cvs add -kb foo.prc  (the Pilot binary. This is so
                                                that not everyone needs a copy
                                                of CodeWarrior to use the code)
ProjDir/src/foo.rsrc   ;; cvs add -kb foo.rsrc (the UI resource file created
                                                by UI constructor)
ProjDir/src/foo.cc/cpp ;; simple cvs add       (any .cc or .cpp files)
ProjDir/src/foo_res.h  ;; simple cvs add       (created by UI constructor)
ProjDir/src/fooRsc.h   ;; simple cvs add. This is not always there.
ProjDir/src/RESOURCE.FRK/foo.rsrc  ;; cvs add -kb foo.rsrc (created by the
                                               (UI constructor. You need this
                                                one and the one in ProjDir/src.)
Note that four of these files are binary. So they must be added to cvs with the -kb flag!
CVS has worked well while we were on Unix. On the PC it has been a bit trying. But we now have all wrinkles out,
but two. The basic idea of CVS is that there is a central code repository into which code is checked in and out.
Multiple programmers can maintain (multiple) copies of the source tree, or of source tree portions. After you make
changes on your copy, you check it in ('commit' it, in CVS terms). If you want to update your source tree snapshot
to reflect the changes people have checked into the repository, you perform an 'update' operation.
The detail section below describe the installation and operation of CVS on PCs as they should work. The subsequent
section (Current CVS Problems and Work-Arounds) explains what we haven't worked out yet. The UNIX machines have
man pages for CVS. Andreas also has a printed version.
4.1 CVS Installation and Operation
CVS is distributed and maintained for GNU FSF by http://www.cyclic.com. They make their money by selling support
for it. The download URL with choices for OS is:
http://www.cyclic.com/cyclic-pages/howget.html
The real URL for Windows (version 1.9.28) is:
http://download.cyclic.com/pub/cvs-1.9.28/windows/.
It only has a single cvs.exe file which is the final thing (i.e not a self-extracting binary). After placing that
file somewhere convenient, Put something like the following into your autoexec.bat and reboot:
rem *** For CVS:
set PATH=C:\users\paepcke\software\cvs;%PATH%
set CVSROOT=:local:t:\CVSROOT
set CVSUMASK=002
set CVSEDITOR=C:\Emacs\bin\runemacs.exe
set HOMEPATH=C:\users\paepcke
Explanation:
Put file .cvsrc into $HOMEPATH. The file should contain a single line: update -d -P
It ensures that when you do a 'cvs update', any new directories are also created in your local tree.
Now all you have to remember is that before using any cvs commands, you need to mount \\bigeye\testbed on drive
T: of your PC (or whatever drive you chose). If you don't, all cvs commands will tell you that they cannot find
T:\CVSROOT\..., and will abort. No harm is done. Just mount the directory and repeat the cvs operation.
To get started, go to wherever you want the dldev tree to be on your PC, and checkout some portion of the source
tree. For example:
cvs checkout dldev/src/PilotsDL
or
cvs checkout dldev/src/wallets
Once you've done a checkout, all you need to do later is updates. Like:
cvs update dldev/src/wallets
to get any changes committed to the repository. You can also add new files or directories. Assume you are in dldev/src/wallets
and have added a new subdirectory on your PC, called 'instruments', and you added some files in that new subdirectory:
   cvs add instruments            // add the new dir to the repository
   cd instruments
   cvs add *                      // add all new files to the dir NOTE BELOW!!!
   cvs commit -m 'Added new instruments dir and files'
NOTE: if you add a binary file, such as a CodeWarrior project file (.mcp), CodeWarrior constructor file (.rsrc),
or Java byte code (.class), add the file as like this:
cvs add -kb WalletTests.mcp
This will tell cvs not to stick its header files anywhere in the file, or do line ending conversion,
etc.
The commit is necessary, because adding files and directory is only 'scheduled', not executed, till a commit. The
'cvs add' will tell you so, no need to remember.
4.2 Current CVS Problems and Work-Arounds
We have experience a few problems which should be solvable by an enterprising soul. Here they are:
4.2.1 New Directories Not Coming in During
'Update' Operation
Even though the .cvsrc file described above is supposed to tell cvs that when you do an update operation, you want
any new directories that were added to the repository since your last update to be brought over into your source
snapshot, they don't. How's that for a sentence? The symptom is that you'll do a 'cvs update', expecting that great
new subtree to come over, but it doesn't. Solution: use 'cvs update -d'.
4.2.2 Permissions Screwed Up in Repository
This problem only occurs when you add a *new* file or directory to the repository, using 'cvs add'. It does not
happen when you commit changes to an already existing file. What you need to do after adding files is to log into
Shrimp as user 'testbed'. Cd to '~testbed/CVSROOT/dli2/src/...' until you find the file(s)/directory you added.
Then make sure that each file's owner is 'testbed', and that each file has at least read permission for everyone.
5. PalmPilot
and Telecommunication
- Modem setup for dialout through Emulator:
   * Prefs->Modem:
      - Standard
      - 14,400bps
      - Speaker: Low     // anything, of course
      - FlowCtl: off     // !
      - String: AT&FX4   // Default

   * Prefs->Network
      - Service: Unix
      - Username: paepcke
      - Password: <enter your PPP dialin pwd for 1-650-325-1010>
      - Phone: 1-650-325-1010  // Check dialout prefix: '9,' if at Stanford
      Prefs->Network->Details
        - Connection type: PPP
        - Idle timeout: Power OFF
        - Primary DNS: 171.64.64.64
        - Secondary DNS: 171.64.7.99
        - IP Address automatic
        Prefs->Network->Details->Script
          - WaitFor:name:
          - SendUserID:
          - SendCR:
          - WaitFor:word:
          - SendPassword:
          - SendCR:
          - WaitFor:>
          - Send: ppp
          - SendCR:
          - GetIP:

- Modem settings for dialout on Pilot device:
  For an actual Pilot device: Prefs->Modem: Use Pilot Modem US.
  Speed 19,200, and Flow Control: Automatic. Else same.

- Ricochet (wireless) modem setup for Palm pilot device:
   * Prefs->Modem:
      - Custom
      - 57,600bps
      - Speaker: Low     // anything, of course
      - FlowCtl: Automatic
      - String: ATX4&C1&K1

   * Prefs->Network
      - Service: Ricochet (new service: make it via menu->New)
      - Username: (not required)
      - Password: Prompt
      - Phone: 777
      Prefs->Network->Details
        - Connection type: PPP
        - Idle timeout: Power OFF
        - Primary DNS: 168.253.48.19
        - Secondary DNS: 198.6.1.1
        - IP Address automatic
        Prefs->Network->Details->Script
          - (empty script, only End)

- Modem settings for dialout on emulator via Rocochet:
  Same as on device, but with Flow control OFF.

- Minstrel (wireless) modem setup for Palm pilot device:
   * Prefs->Modem:
      - Standard
      - 57,600bps
      - Speaker: Low
      - FlowCtl: Automatic
      - String:(blank, no string required)

   * Prefs->Network
      - Service: Minstrel (new service: make it via menu->New)
      - Username: (leave blank)
      - Password: Prompt
      - Phone: 00(zero zero)
      Prefs->Network->Details
        - Connection type: PPP
        - Idle timeout: Power OFF
        - Primary DNS: 168.253.48.19
        - Secondary DNS: 198.6.1.1
        - IP Address automatic
        Prefs->Network->Details->Script
          - Delay:1
          - Send:at\\appp
          - SendCR:
          - WaitFor:1
6. CodeWarrior Windows SDK Support and Pilot Emulator Installation
CodeWarrior support for the Pilot under Windows has been updated. Part of this update includes new networking facilities.
Another part includes the Pilot Emulator. Here are instructions on how to put the latest Windows SDK on top of
CodeWarrior Rel. 4. The instructions for the Emulator are also in this section.
My installation of these components is in
c:\users\paepcke\software\PilotSoftware\coPilot\PalmOSEmulator
and
c:\users\paepcke\software\PilotSoftware\PalmOSSDK30 (for the SDK zip only)
- Install Code Warrior via CD-ROM
- Download 3COM's Emulator (formerly Co-Pilot) from the Web:
http://palm.3com.com/devzone/pose/seed.html
- Download CodeWarrior emulator plugin to make code warrior start the emulator:
http://palm.3com.com/devzone/pose/seed.html (i.e. same as emulator)
- Download corresponding debug ROMs 3.0 and 2.0. Official entry point is:
http://palm.3com.com/devzone/rom3/debugrom.html
Save time of filling in form and accepting license by going directly to:
http://palm.3com.com/devzone/rom3/romdl.html
- Download 3.0 PalmOS SDK from:
http://palm.3com.com/devzone/tools/sdk30.html
This adds stdio and many other UNIX-like libraries and things.
- Unzip emulator, plugin, and ROM. I only unzipped and used the 3.0 ROM. Copy file 'Palm 3.0 Debug.ROM' to the
emulator directory. Now you
can start the emulator by itself.
- NOTE: The emulator has registry entries which tell it where to look for the ROM file! If you don't put the ROM
file there once the Emulator ran
and initialized the registry, you'll get a TRAP$0 error on startup of the Emulator. You can
change the registry entry to get it to work again.
- The PalmOS Emulator supports an API for external debuggers. At this time, only Metrowerks' MWDebug debugger (from
CodeWarrior) supports
this API in the form of an updated PilotPlugin.dll component. Download this component and use it to replace
the same-named component in your
CodeWarrior installation. This is at:
C:\Program Files\Metrowerks\CodeWarrior\bin\Plugins\Debugger
NOTE: the old file will sometimes still be recognized by the debugger, even if you rename it!!!! The symptom
then is that the debugger will keep
asking you to put the real Pilot in its cradle. Renaming worked for me on W95, and for someone else. But
on Topsmelt it failed. We had to move
the old one out.
You can then start the debugger as normal; it should behave just as if it was connected to a real Palm Computing
Platform device, even though it's
actually working in conjunction with the emulator. By using the debugger's preferences panels, you can configure
the debugger to target debugger to
target either the PalmOS Emulator or an actual hardware device when debugging.
- Unzip 3.0 PalmOS SDK into
C:\Program Files\Metrowerks\CodeWarrior\PalmPilotWinSDK
This will replace some of the files (tutorials, etc.)
7. CodeWarrior Tricks and Gotchas
There are a few things you should know about CodeWarrior and the Pilot. Please, everybody, add to this list as
you learn nasty things.
Example:
Char foo[] = "Blue skies are great for skiing"
will give you a char array of the right length, but the string will be cut off after 12 chars.
For R4, use the following project preferences:
In the Code generation 68K processor panel:
Peephole Optimizer on,
CSE optimizer on,
PC-Relative is on, and
8-byte doubles on.
Everything else off.
In the Global optimizations pane:
everything off.
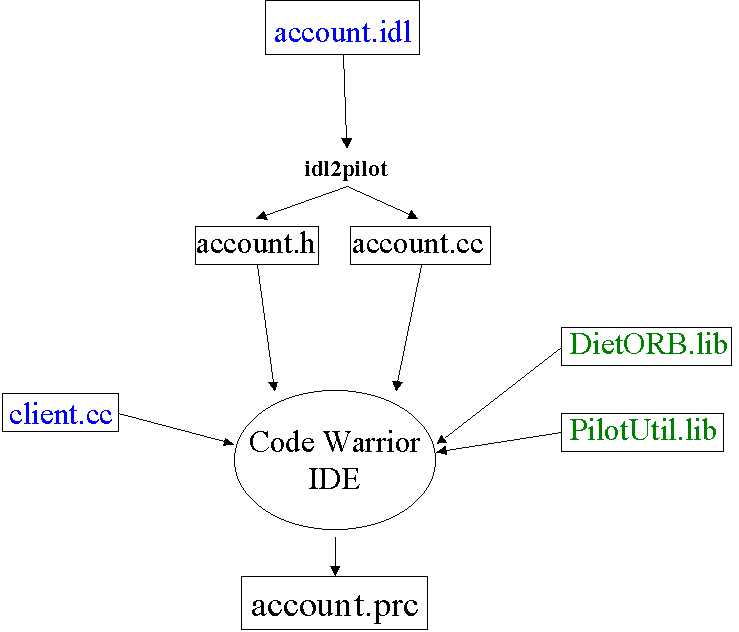
8. Using the DietORB library
Follow these easy steps to build a CORBA client program which uses the DietORB library for the PalmPilot.
1) Start with an idl file such as this one:
account.idl:
interface Account {
    void deposit( in unsigned long amount );
    void withdraw( in unsigned long amount );
    long balance();
};
2) Run the perl script idl2pilot to get the client stub files:
idl2pilot account.idl
will give you account.h and account.cc
Note: the idl2pilot script calls the mico idl compiler "idl", so make sure that it is in your search
path.
3) Make sure that the server is running. Get its IOR, or, if it registers itself with the Stanford services registry,
get the group and service name that the IOR is published under. For example, the account server is currently registered
under "dl/Services/InfoProcessing", "Account".
4) Write the client program. Aside from the Palm UI code, this is how it would call the server functions exported
in account.idl:
client.cc:
#include "account.h"

// Global variable
Account *acc = NULL;

void initialize (...) {
  acc = NEWSTUB(Account)("dl/Services/InfoProcessing", "Account");
  ...
}

void deposit (unsigned long amount) {
  try {
    acc->deposit(amount);
  }
  catch (PilotException& e) {
    e.AddEventHistory("deposit : failed to deposit");
    e.DisplayEventHistory();
    return;
  }
}

...
5) Build and run the program:
The project consists of these files:
client.cc
account.cc
account.rsrc
DietORB.lib
PilotUtil.lib
Also make sure that the path leading to CORBA.h is included in the search path for the project.
And that the two libraries are each given its own linkage segment because they are kind of big. To put the libraries in separate segments, go to the "Segments" tab in the project window in CW, then select "Project/Create New Segment..." After the new segments are created, drag the libraries each to a new segment.
You should be all set to go!